A “Form” page/section enables you to set up a custom form to gather information from your visitors and users. The information is gathered through textfields, checkboxes, radio buttons, drop-down menus, and other interface items, which you specify, and sent to an email address of your choice. Submissions are stored in the database and can be viewed in the backend administration. The form may optionally contain a captcha, to help avoid spamming.
The Form Editor has two main buttons - “Add Field” and “Settings” - as well as 2 sub-sections - “Modify/Delete Field” and “Submissions”.
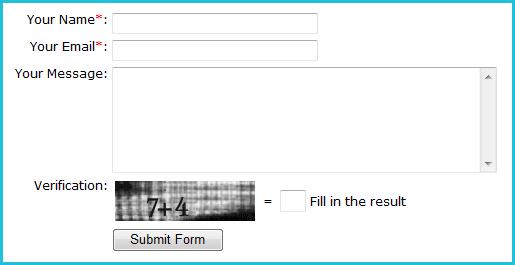
A very simple contact form
Add Field Button
Click this button to add an interface item to your custom form. Once clicked, your options will be:
- Title: The name of the item, which is displayed on the form.
- Type: Can be one of:
- Heading: a 'title' or emphasized text that appears on the form
- Short Text: a single-line text field
- Long Text: a large, multi-line text field
- Select Box: a drop-down menu or a listbox with multiple selections possible
- Checkbox Group: Choose from the several checkboxes – each checkbox can be selected seperately from the others.
- Radio Button Group: A list of options, where only one can be selected - selecting one is deselecting the others.
- Email address: A single-line text field, where the user must enter a properly formatted email address – if text is enetered which is obviously not an email address, the form will not be submitted.
- Save/Cancel Buttons: Click to save the entered Title and Type, or to cancel and return to Admin->Pages->Modify Page.
When should you use a Radio Button Group, and when should you use a Select Box instead?
The rule-of-thumb is, that if there are more than 3 options available, you should use a Select Box.
Additional Options
Once you have clicked the “Save” button for the first time, additional options appear depending on the type of field you chose.
- Heading: Using the “Template” field you can specify - using a combination of html and WB markup such as or - the layout of the heading.
- Short Text: Set the length of the field (in characters), default text to appear in the field and specify whether the field is required or not (see below).
- Long Text: Enter a default text to appear in the field and decide whether the field is required or not (see below).
- Select Box: Enter the options to be listed and optionally a specific size for the menu/box. If “Allow Multiple Selections” is “Yes”, a listbox is going to be displayed, otherwise it will be a drop-down menu. You can also specify whether a selection is required or not (see below).
- Checkbox Group/Radio Button Group: Enter the options to be listed as well as an optional separator character to be put between each option. You can also specify if a selection is required or not (see below).
- E-Mail Address: Specify whether the field is required or not (see below).
If an item is marked required, the form is not going to be submitted, unless the user has entered (correct) information or made a selection.
Settings Button
Click this button to configure the functionality of your form. Once clicked, your options will be:
General Settings
- Captcha Verification: displays a captcha to help avoid spammers
The use of captcha verification is defined in "Admin-Tools -> Captcha and Advanced-Spam-Protection (ASP) Control", e. g. the type of captcha and Advanced Spam Protection (ASP), which is a spam protection function invisible for humans.
- Max. Submissions Per Hour: Small values can help avoid spamming.
- Submissions Stored in Database: The number of submissions that the database will store – when number is exceeded, the oldest entries will automatically be deleted.
- Header: a mixture of html and WB markup code that opens the form
- Field Loop: a mixture of html and WB markup code that is repeated for every interface item defined in the form
- Footer: a mixture of html and WB markup code that closes the form
Email Settings
- Email to: the email to which form submissions will be sent
Note: You need to enter a valid mail address, otherwise no emails will be sent. - Email from: Submissions will reach you as if they were sent from this address. You can enter an email address or choose one from your form's email fields - if available.
- Email Name: the name of the sender of the email
- Email Subject: the subject heading of the email the form will send
Success Settings
- Email Text: This message is displayed in the email to the user (if an entry is chosen in Email To:) and as well on the website (if there is no success page defined) after the information is submitted successfully.
- Success Page: Choose a page which you want to appear after the form has been sent.
Email clients offer the function of defining rules or filters, which automatically handle emails sent by your website's form and emphasize or file them for example, based on the email subject. See your email client's documentation for details.
Edit CSS
Almost all modules for modern versions of WebsiteBaker (2.7 and higher) offer the function to edit backend.css to change the layout of the backend part of the module and frontend.css for the frontend layout. WebsiteBaker provides you with the comfortable Editarea editor, which contains amongst others syntax highlighting which helps avoid sources of errors. Some css experience can be useful however.
Modify/Delete Field
Use the “Modify/Delete Field” list to reorder, edit or delete the items of your form.
To edit the settings of an existing item, click on its leftmost “Settings” icon or its title.
![]() Click on the “Settings" icon – or the title
Click on the “Settings" icon – or the title
To delete an item, click on its rightmost “delete” icon.
![]() The "Delete" icon
The "Delete" icon
To move an item up or down in the form, click the item's “up” or “down” icon.
![]()
![]() The "up" and "down" icons of every item
The "up" and "down" icons of every item
Submissions
The list in this section will contain the submissions of users and visitors who have used your form. Only a defined number of submissions is stored in the database – by default, 100. You can change this number in the form's Settings.
You can use the list to view and delete the submissions received.
To view a stored submission, click the “Submission Folder” icon.
![]() The "Submission Folder“ icon
The "Submission Folder“ icon
To delete a submission, either click the “delete” icon rightmost in the submissions list , or, while viewing the submission, click the “Delete” button.
![]() The “Delete” icon
The “Delete” icon