Installer Walkthrough
- Step 1: Check requirements
- Step 2: Check permissions
- Step 3: Webaddress
- Step 4: Operating system
- Step 5: Database
- Step 6: Website title
- Step 7: Administrator (Superadmin)
- Step 8: Completing the installation
- What's next?
Step 1
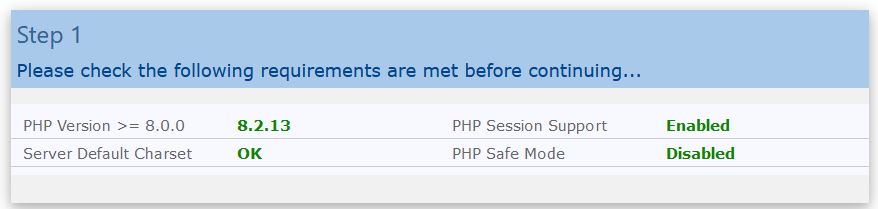
Step 1 of the installer checks for some of the basic minimum requirements for running WebsiteBaker.
If any of the items here is displayed in RED, you will not be able to successfully run WB.
If you received a warning, in order to be able to use WebsiteBaker you may need to ask your internet service provider or system administrator to upgrade PHP, enable PHP Session Support, or disable PHP Safe Mode, as the case may be.
Here, everything is okay in Step 1 of the installer:
Step 2
WebsiteBaker needs to be able to write to several files and directories, which are listed in Step 2. Sometimes, as different programs decompress, download and upload the installation files, they may change a file's or folder's permissions. So, if any of the items in Step 2 is listed as "not writeable”, you must correct its permissions, so WB will be able to write to it.
Here, everything is okay in Step 2 of the installer:
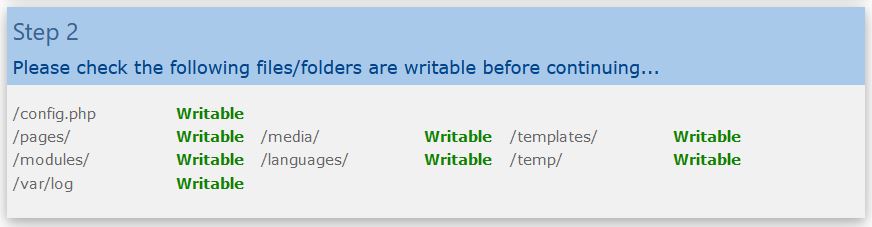
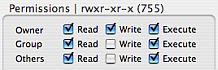
You should be able to correct the permissions of the items you just uploaded with your ftp client. Ftp clients usually allow you to set the permissions of any file or directory to which you have ftp access - usually by clicking on checkboxes for the right to “read”, “write” and “execute” the file, or simply by providing a code number which indicates the permission level.
The recommended permission level:
Files: 644
Folders: 755
Changing permissions with ftp client “Cyberduck”, on the Macintosh:
Step 3
In Step 3, WebsiteBaker needs to know the URL (web address) of where it is installed. This is the address that users will have to type into their web browsers to reach your WB site. The installer tries to guess what this address is, based on information it gets automatically from your server, but you should check to make sure that this is correct.
Checking the URL in installer Step 3:
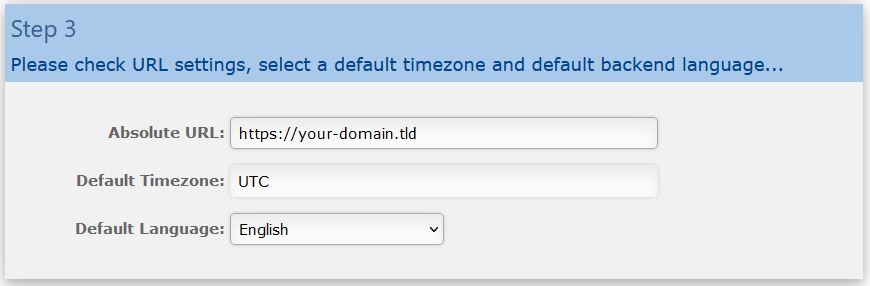
Here you can also specify the default timezone for your site. This should be the timezone of the server where you are installing WB.
If you do not know the timezone of your server, but know in what city your server is located, you can look it up on https://en.wikipedia.org/wiki/Time_zone .
Step 4
WebsiteBaker needs to know whether the server it is running on is a Windows server, or a Linux/Unix server (Mac OS X Server is a Linux/Unix-based server) – select the appropriate radio button in Step 4.
World-writeable file permissions (777)” should never be on for a real live site. Turning this option on enables anyone to access all your site's folders and files, and make any changes they'd like. This option is used only by programmers and developers, during testing and troubleshooting.

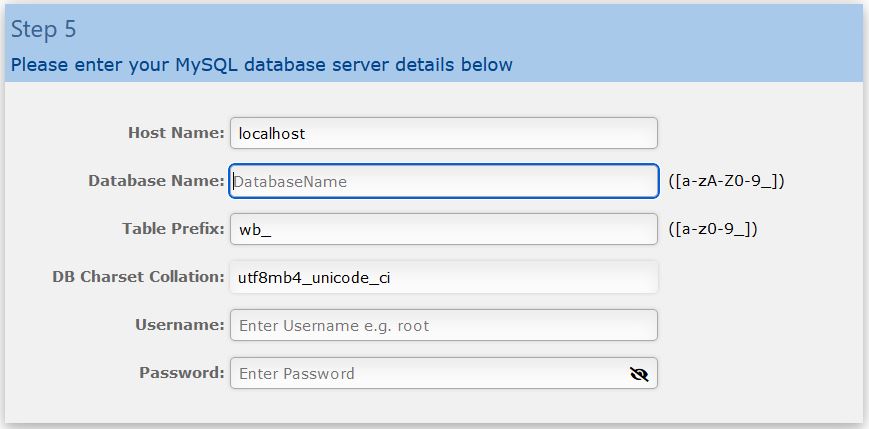
Step 5: Database
Inn Step 5 you give the installer the information WB needs to access your MySQL database. If the database is on the same server as WebsiteBaker, “Host Name” will usually be “localhost”. If your MySQL installation is on another server, you may have to enter your server's name or URL here. You must also enter the database name, and a database username and password.
The database user must have sufficient permission level to add/modify/delete tables and records in the database.
Usually, you will have 1 database setup for every site you administer. Some hosting accounts, however, only allow you to have a very limited number of databases, and if you have a large number of sites, it is easy to end up running out... In this case, you may need to use the same database for more than one site. If the database you are using will also be used by other programs - or other installations of WB - you need to give your tables a unique prefix, such as “mycompany_”, to help you identify the tables that belong to this site inside your shared database.
If you created this database specially for this site, and just for this installation of WB - and you do not intend to use it for any other sites in the future - then you do not need to use any Table Prefix, and can leave this field blank.
Entering database information during Step 5:
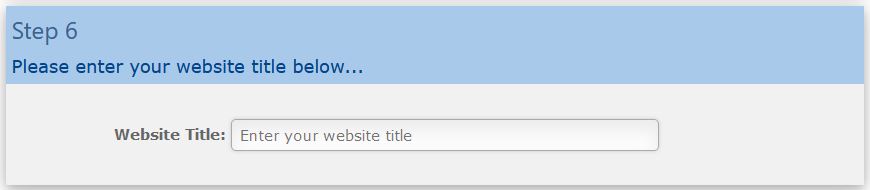
Step 6: Website title
The website title to be entered in Step 6 will appear throughout your entire site. Do not worry about entering a 'wrong' title here, however, as you can always change (or correct) it afterwards.
Entering your website's title in Step 6:
Step 7: Administrator (Superadmin)
When WebsiteBaker is first installed, you must straight away create an account for the most important user in your site: the site Administrator. The Administrator is a user who has full rights to manage and alter the site, as well as add, modify and delete all other users. This is what you do in Step 7.
Creating the administrator account in Step 7:

Step 8 (Completing the installation)
Last of all, scroll to the bottom of the installer page, and click the “Install WebsiteBaker” button. The installer will check your settings, install all database tables, store your configuration, and if all goes smoothly, within a few seconds you will be taken to the Admin section of your new WebsiteBaker site!
What's next?
You should browse through all areas of your site Admin, at leisure, and explore them. Once you are comfortable with the administration of your site, you may want to check out the many ways of enhancing and expanding WebsiteBaker, by visiting the Add-ons Repository .
Add-Ons include language packs (to display your site's interface in different languages), templates (to totally change and customise the appearance of your site), and modules (to add more page types, and functionality to your site).
If you are a web designer, and would like to create your own templates for WebsiteBaker, you should read the Designer Guide . If you are a developer, and wish to create new modules for WB, you should read the Developer Guide .
Have fun!